OSEPP Uno R3 Plus (and minus)
A great place to shop near me in Needham, MA is You-Do-It Electronics, especially when they have one of their seasonal sales.During last February's "Presidents' Day Weekend" promotion, I found this "'OSEPP™ 101 Arduino Basics Starter Kit' in the bargain bin for $5.00 (normal retail price is around $70):

The contents look pretty good (especially for $5):
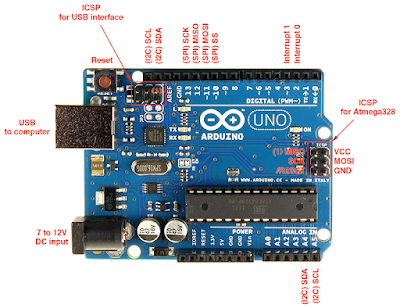
But the "OSEPP Uno R3 Plus" board is slightly different than an "ARDUINO UNO":
In particular:
- Replaced USB-B connector with mini-USB connector
- Molex connector to connect to OSEPP sensors and other I2C devices.
- Surface-mount AVR microcontroller instead of a socketed DIP
- Reset button location changed
- USB ICSP header pins removed
So I put the kit on the shelf until my son felt like going through the tutorials that do a good job teaching Arduino basics.
Recently I needed a spare UNO to debug some stepper motors for the Shapeoko CNC machine we are building at MIT's Edgerton Center. I raided Zack's desk and setup the Uno R3 Plus, but ran into a problem where XLoader would not upload the pre-compiled hex code that I wanted to test. I then tried using the Arduino IDE to upload the basic "Blink" program and that did not work either.
Going to the OSEPP kits product site to see if 'Blink' was different for the R3 Plus, I saw this statement under 'Tutorial 1':
b) Load the blinking LED example sketch by clicking “File → Examples → Basics → Blink”, and another Windows with the Blink sketch will appear.
c) Select your board by clicking “Tools → Board → Arduino UNO”. (IMPORTANT: If your sketch does not load properly using this selection, please select Arduino Duemilanove or Nano w/ ATmega328. It was brought to our attention that some of our UNO R3 boards may have been loaded with this bootloader instead (we are embarrassed). Functionally, it is the same so no real concerns. Please accept our apologies!! If you have any concerns, please email Support@osepp.com and you will be looked after!)I also read here:
DISCONTINUED PRODUCT the UNO R3 is legacy hardware. Production for the UNO R3 has ceased as of June 2016. This page serves as reference material.
The most recent UNO is the UNO R4:
http://osepp.com/products/arduino-compatible-boards/uno-r4-plus/
New features in R4:
• ATMEGA 16U2 Chipset
• Micro USB connector
• 4 additional 5v and GND power pins
• Additional analog pins A6 & A7
“Plus” Features:
• Replaced mini-USB connector with the more popular micro-USB connector
• removed the Molex connector
Back in the Arduino IDE, I switched the board type from 'UNO' to 'Duemilanova' and got 'Blink' to upload and run. But this same selection change did not work for XLoader. Since I couldn't swap in another AVR chip with the correct bootloader, I decided to see if I could reprogram the AVR chip in place rather than send the obsolete board back to OSEPP for out-of-warranty service.
Instructables has a nice example using the USBtinyISP programmer I had already built to repair our Printrbot controller (see my earlier blog post), but I needed to set up the board on my new laptop. This was somewhat problematic in that my Windows 10 installation did not initially recognize the Windows 7 drivers that I downloaded from Adafruit. Searching the Adafruit forum for the error message "device will not start code 10" produced multiple hits that all involved uninstalling and reinstalling the drivers, which I did without sucess.
Finally I tried one suggestion to use a different USB port, and it worked! (and also now the original port worked, too !?!)
With the USBtinyISP recognized, I connected it to the 6-pin ISP header on the R3 Plus and reflashed the bootloader. Note that avrdude.exe, avrdude.conf, and the bootloader hex file are all included in the Arduino IDE installation in different subdirectories:
- Arduino/hardware/tools/avr/bin/avrdude.exe
- Arduino/hardware/tools/avr/etc/avrdude.conf
- Arduino/hardware/arduino/avr/bootloaders/optiboot/optiboot_atmega328.hex
avrdude.exe -C avrdude.conf -b19200 -c usbtiny -p m328p -v -e -U flash:w:optiboot_atmega328.hex -U lock:w:0x0F:m -FOnce that ran successfully, I was able to use the "Arduino Uno" board option in both the IDE and XLoader to upload code to the R3 Plus.


